> ## Documentation Index
> Fetch the complete documentation index at: https://developers.momogood.com/llms.txt
> Use this file to discover all available pages before exploring further.
# Setup
> Install and configure the Tatango integration in your SFMC account
Setup happens entirely inside your Salesforce Marketing Cloud and Tatango accounts.
## Step 1: Create an installed package
In SFMC, click your profile icon in the top right and select **Setup**, then go to **Apps → Installed Packages** and click **New**. Name the package something recognizable, such as `Tatango Send Message Activity`.
## Step 2: Add an API Integration component
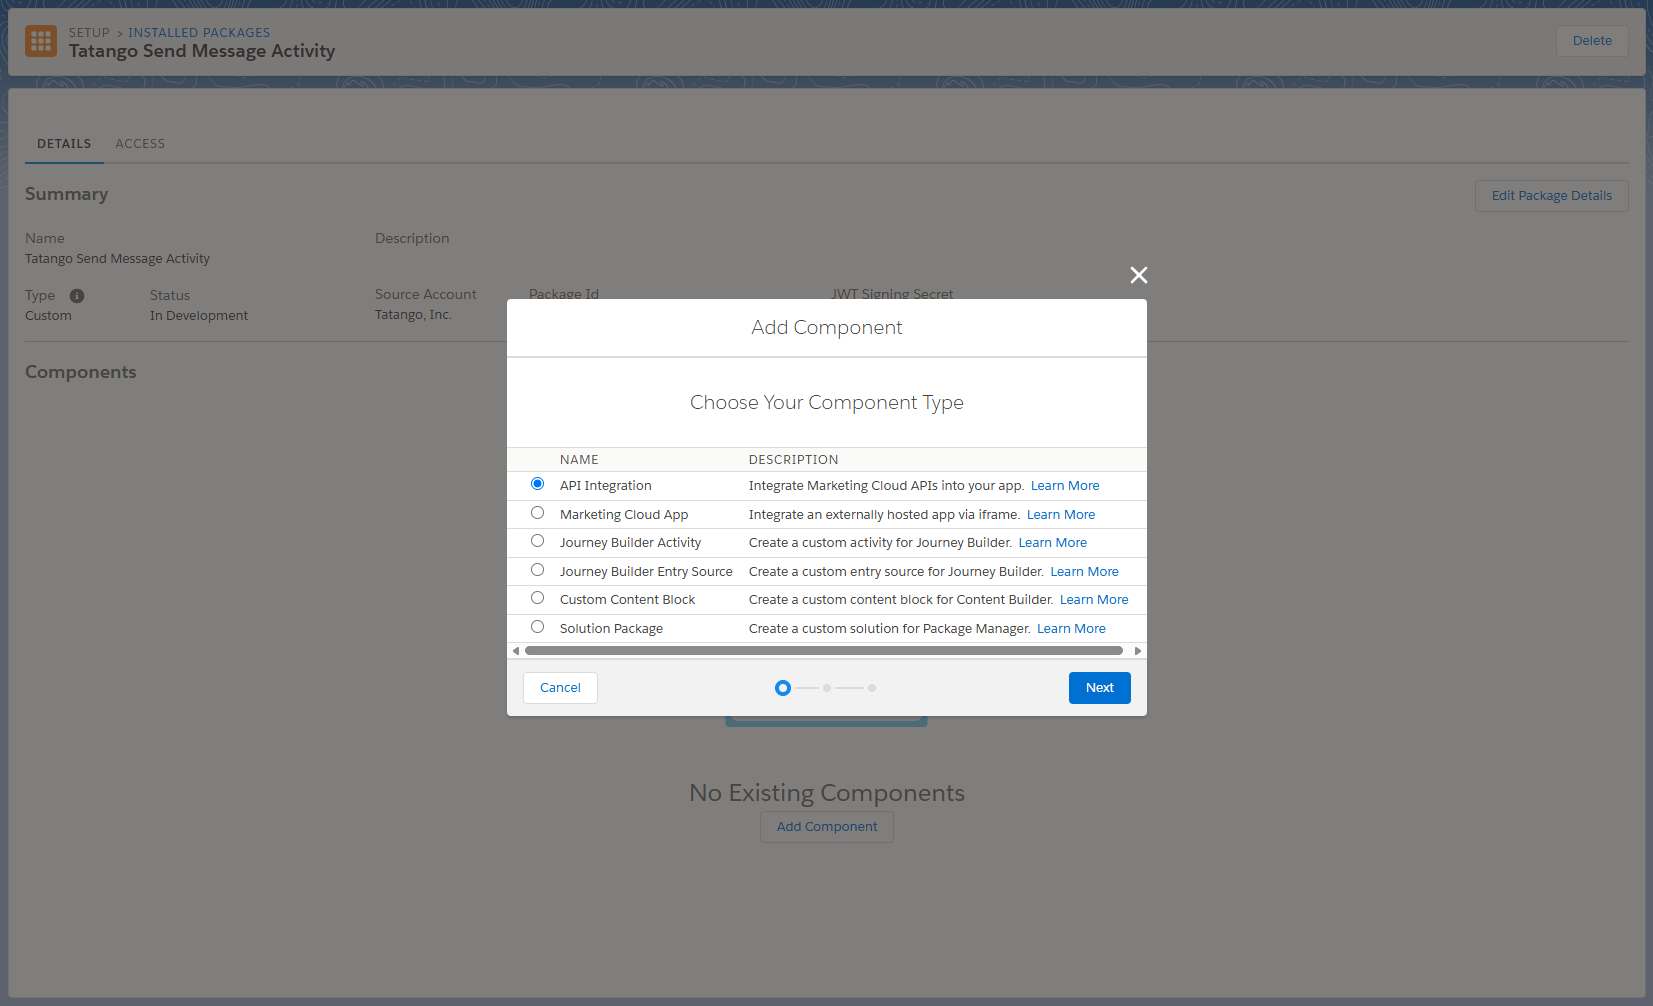
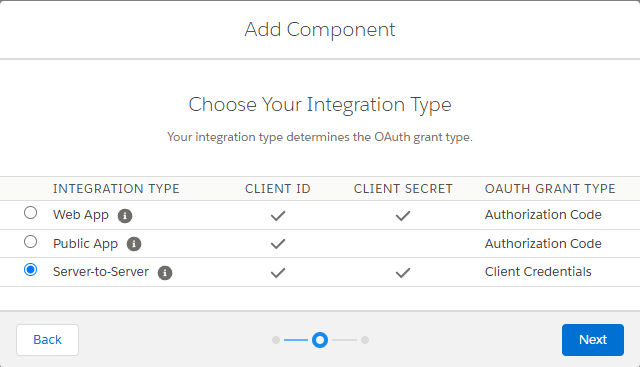
Open the package and click **Add Component**. Select **API Integration**, then the **Server-to-Server** integration type.
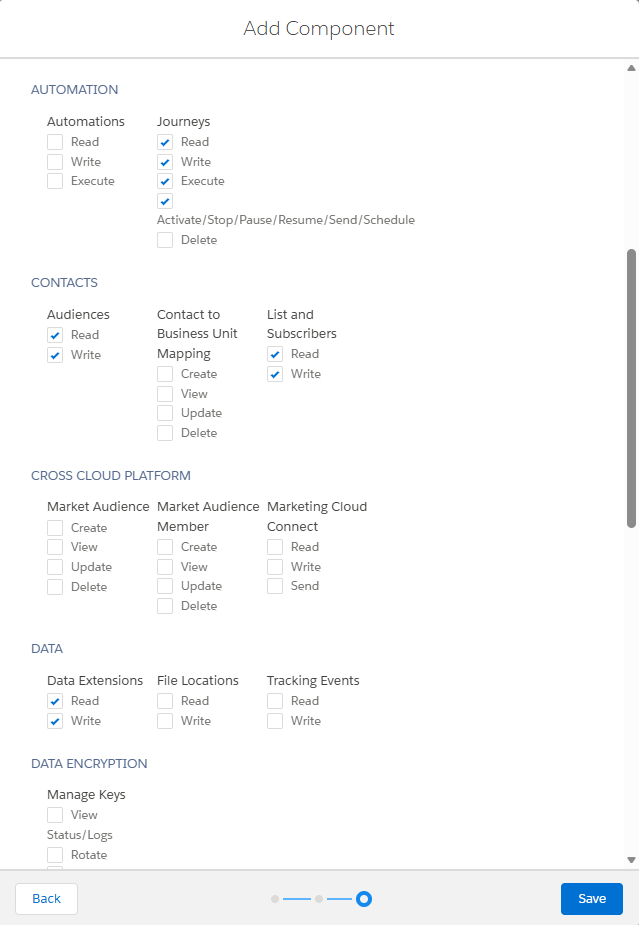
 Grant the component exactly these scopes:
| Category | Scopes |
| -------------------- | -------------------------------------------------------------- |
| Journeys | Read, Write, Execute, Activate/Stop/Pause/Resume/Send/Schedule |
| Audiences | Read, Write |
| List and Subscribers | Read, Write |
| Data Extensions | Read, Write |
Grant the component exactly these scopes:
| Category | Scopes |
| -------------------- | -------------------------------------------------------------- |
| Journeys | Read, Write, Execute, Activate/Stop/Pause/Resume/Send/Schedule |
| Audiences | Read, Write |
| List and Subscribers | Read, Write |
| Data Extensions | Read, Write |
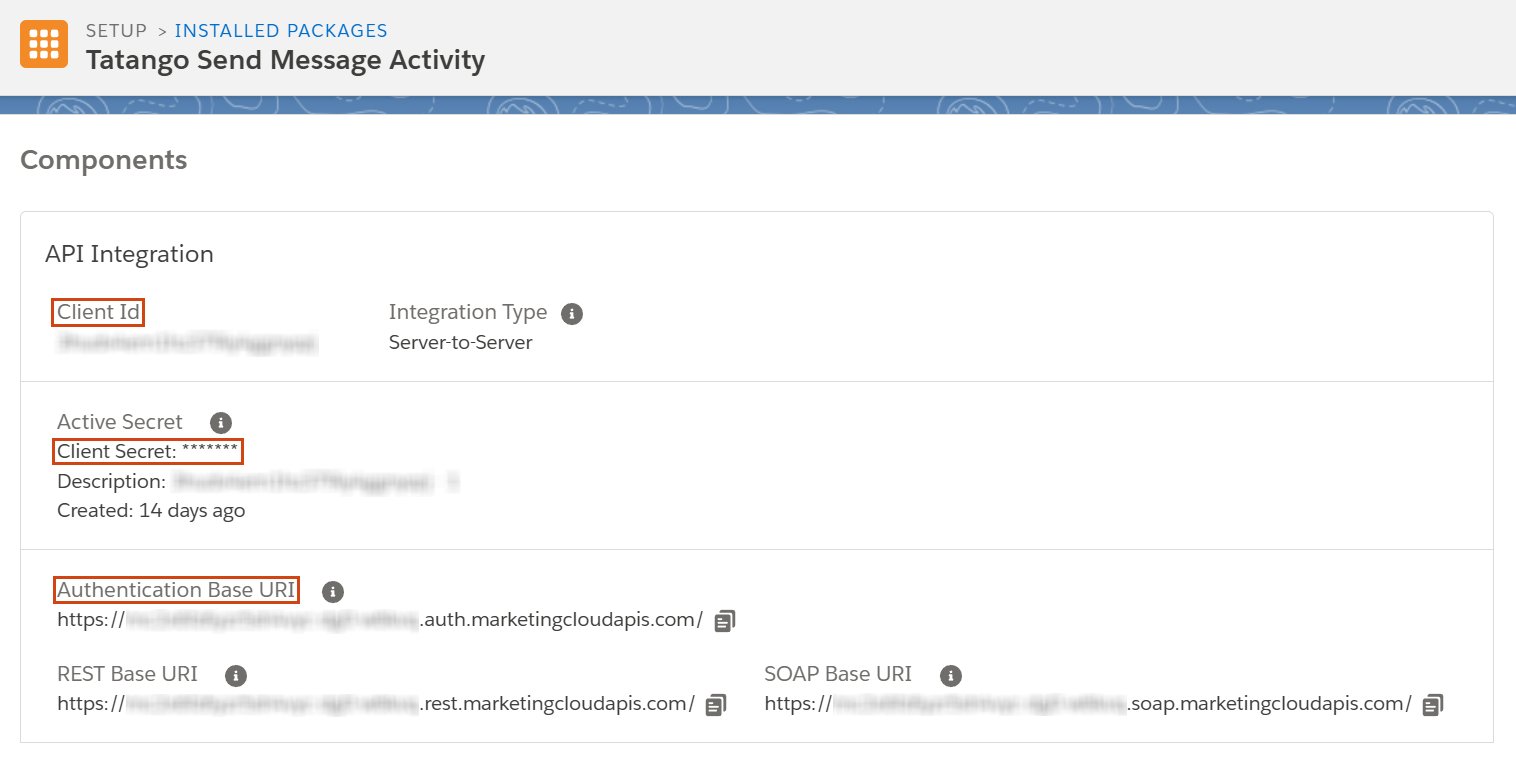
 After saving, the component summary displays three values you will enter during [initial configuration](#step-6-complete-the-initial-configuration):
* **Client Id**
* **Client Secret**
* **Authentication Base URI**
Store the client secret somewhere safe. SFMC only reveals it here.
After saving, the component summary displays three values you will enter during [initial configuration](#step-6-complete-the-initial-configuration):
* **Client Id**
* **Client Secret**
* **Authentication Base URI**
Store the client secret somewhere safe. SFMC only reveals it here.
 ## Step 3: Add the Journey Builder activity
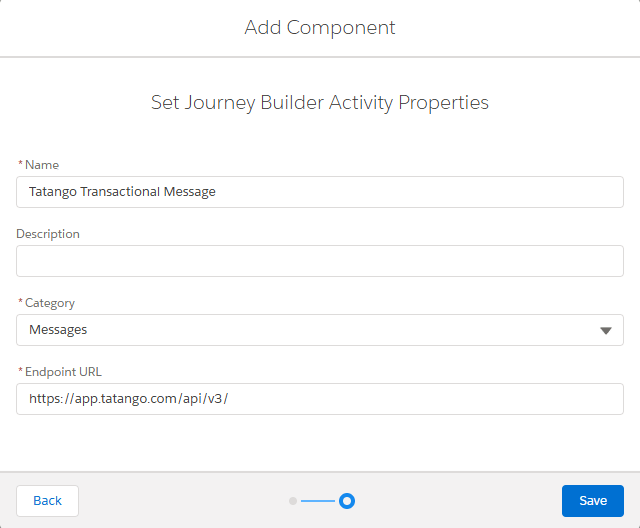
In the same package, click **Add Component** again and select **Journey Builder Activity**. Set:
* **Category**: Messages
* **Endpoint URL**: `https://app.tatango.com/api/v3/`
## Step 3: Add the Journey Builder activity
In the same package, click **Add Component** again and select **Journey Builder Activity**. Set:
* **Category**: Messages
* **Endpoint URL**: `https://app.tatango.com/api/v3/`
 The **Tatango Transactional Message** activity now appears in Journey Builder's activity palette under Messages.
## Step 4: Import the Tatango data extensions
The integration tracks message, reply, and subscriber data in three data extensions. Install them from the deployment package:
Download the deployment JSON, then import it in SFMC.
In SFMC, go to **Platform → Package Manager → Deployment** and start a new install. Upload the JSON in the Package Upload step, and leave Package Customization empty; the package needs no namespacing or customization fields. The Item Validation step lists `tatango_messages`, `tatango_replies`, and `tatango_subscribers`, each with the action **Create a new item**.
The **Tatango Transactional Message** activity now appears in Journey Builder's activity palette under Messages.
## Step 4: Import the Tatango data extensions
The integration tracks message, reply, and subscriber data in three data extensions. Install them from the deployment package:
Download the deployment JSON, then import it in SFMC.
In SFMC, go to **Platform → Package Manager → Deployment** and start a new install. Upload the JSON in the Package Upload step, and leave Package Customization empty; the package needs no namespacing or customization fields. The Item Validation step lists `tatango_messages`, `tatango_replies`, and `tatango_subscribers`, each with the action **Create a new item**.
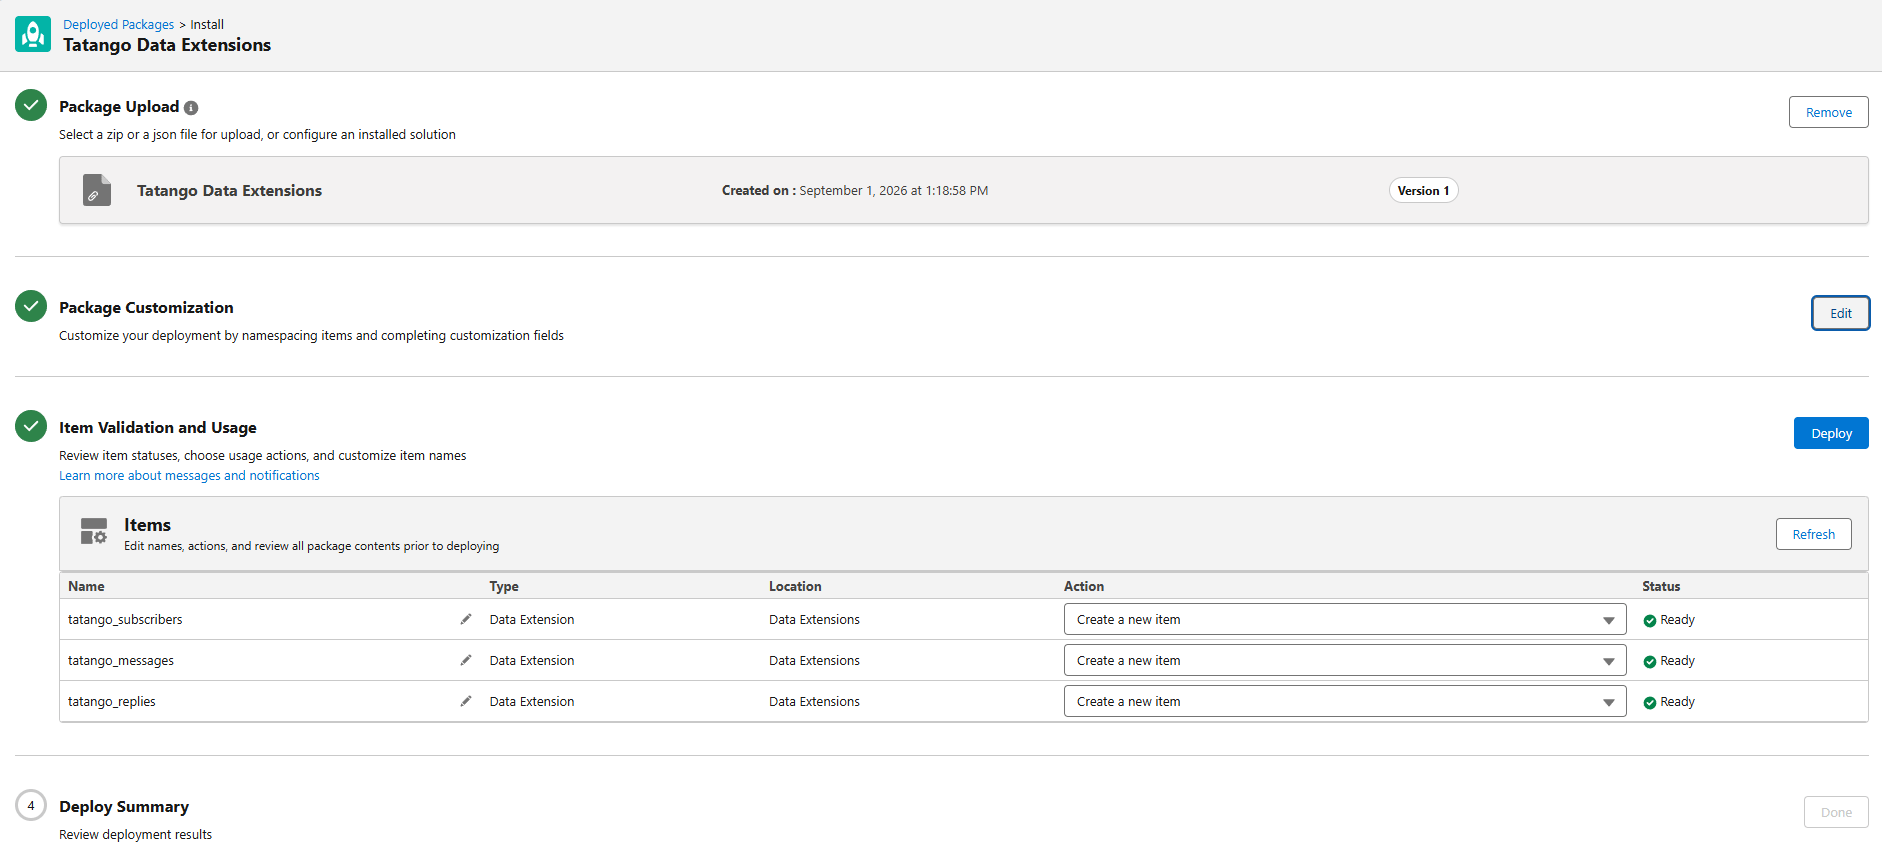 Click **Deploy**. This creates the three data extensions in Contact Builder; their fields are documented on the [data extensions](/messaging/sfmc/data-extensions) page.
## Step 5: Create a Tatango API key
Go to the [API keys page](https://app.tatango.com/api_keys) in the Tatango app (**My Account → API**) and click **Create API Key**.
Any API key works, but we recommend creating a dedicated key with a label that identifies its purpose (for example, `SFMC`) so you can always tell which key the integration relies on.
Disabling the API key used by the integration stops all message sends from your SFMC journeys.
## Step 6: Complete the initial configuration
Open Journey Builder, drag the **Tatango Transactional Message** activity onto any journey canvas, and open it. On first use, you'll see a message that your account is not configured for Salesforce, with a link to the configuration page.
Click **Deploy**. This creates the three data extensions in Contact Builder; their fields are documented on the [data extensions](/messaging/sfmc/data-extensions) page.
## Step 5: Create a Tatango API key
Go to the [API keys page](https://app.tatango.com/api_keys) in the Tatango app (**My Account → API**) and click **Create API Key**.
Any API key works, but we recommend creating a dedicated key with a label that identifies its purpose (for example, `SFMC`) so you can always tell which key the integration relies on.
Disabling the API key used by the integration stops all message sends from your SFMC journeys.
## Step 6: Complete the initial configuration
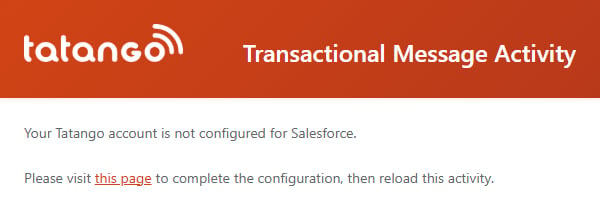
Open Journey Builder, drag the **Tatango Transactional Message** activity onto any journey canvas, and open it. On first use, you'll see a message that your account is not configured for Salesforce, with a link to the configuration page.
 Follow the link (or go directly to [app.tatango.com/api/v3/sfmc/initial\_config](https://app.tatango.com/api/v3/sfmc/initial_config)) and enter:
| Field | Value |
| ----------------------- | ---------------------------------------------------------------------------------------- |
| Tatango API Key | The API key from [step 5](#step-5-create-a-tatango-api-key) |
| Client ID | From the API Integration component in [step 2](#step-2-add-an-api-integration-component) |
| Client Secret | From the API Integration component in [step 2](#step-2-add-an-api-integration-component) |
| Authentication Base URI | From the API Integration component in [step 2](#step-2-add-an-api-integration-component) |
Click **Save Configuration**. Saving verifies the credentials against your SFMC account, and if a field is rejected the form indicates which one to correct.
Reload the activity in Journey Builder. Configuration is complete, and every user in your SFMC account can now use the activity. Next, [send your first message](/messaging/sfmc/sending-messages).
## Troubleshooting
This is the first-use state: complete the [initial configuration](#step-6-complete-the-initial-configuration), then reload the activity.
The form checks each value against your SFMC account and flags the field to fix. Re-copy the flagged value from the API Integration component summary ([step 2](#step-2-add-an-api-integration-component)), and make sure the Tatango API key is correct and enabled.
Expected: Journey Builder doesn't recognize custom activities as messaging activities, so it shows a "Missing Message Activity" recommendation. It's safe to ignore and doesn't block activation.
Follow the link (or go directly to [app.tatango.com/api/v3/sfmc/initial\_config](https://app.tatango.com/api/v3/sfmc/initial_config)) and enter:
| Field | Value |
| ----------------------- | ---------------------------------------------------------------------------------------- |
| Tatango API Key | The API key from [step 5](#step-5-create-a-tatango-api-key) |
| Client ID | From the API Integration component in [step 2](#step-2-add-an-api-integration-component) |
| Client Secret | From the API Integration component in [step 2](#step-2-add-an-api-integration-component) |
| Authentication Base URI | From the API Integration component in [step 2](#step-2-add-an-api-integration-component) |
Click **Save Configuration**. Saving verifies the credentials against your SFMC account, and if a field is rejected the form indicates which one to correct.
Reload the activity in Journey Builder. Configuration is complete, and every user in your SFMC account can now use the activity. Next, [send your first message](/messaging/sfmc/sending-messages).
## Troubleshooting
This is the first-use state: complete the [initial configuration](#step-6-complete-the-initial-configuration), then reload the activity.
The form checks each value against your SFMC account and flags the field to fix. Re-copy the flagged value from the API Integration component summary ([step 2](#step-2-add-an-api-integration-component)), and make sure the Tatango API key is correct and enabled.
Expected: Journey Builder doesn't recognize custom activities as messaging activities, so it shows a "Missing Message Activity" recommendation. It's safe to ignore and doesn't block activation.